Tuesday, September 18, 2012

National Cheeseburger Day!


Happy National Cheeseburger Day!

Who doesn’t love a good burger? When I wasn’t eating meat for a little while, I ate plenty of veggie burgers but none of them come close to satisfying a craving for a real old fashioned beefy cheeseburger.

Burgers are an ultimate comfort food for me. When I want to eat my feelings, I usually look for a burger piled with toppings and dripping with juice and sauce. French fries are just a plus. The burger is enough to make my mouth water and my eyes close with tasty enjoyment. I even have a separate binder full of burger recipes so when I want one I can easily look through it to pick one out. Sooooooooooo good.

So what makes the perfect cheeseburger? I did some looking around. Bon Appetit, Gourmet, and Fine Cooking all agree that you should start with a ground beef with an 80/20 meat to fat ratio. Usually, we cook with 90/10 ground beef, even for our hamburgers just to save on calories and to cut out that fat that we don’t really need in our diets. But its national cheeseburger day! We got a little crazy and didn’t skimp on the fat content for these burgers!


All three magazines also agreed that you don’t need any other flavorings for a good burger apart from salt and pepper for seasoning. You’re topping it with either American or Cheddar cheese. I don’t eat American cheese if I have a say in the matter. (Food snob, I know.)

Toppings? I like any and all toppings but everyone is different. My choices for tonight? Bibb lettuce, tomato, sweet onion, thousand  island dressing, and dill pickle relish!

As for recipes, we chose Bon Appetit’s  BA Burger Deluxe. (With a name like that, how can you go wrong?)

All I did differently apart from the slice of cheddar was add about a tablespoon of A.1. steak sauce to the meat mixture before we formed patties. Oh! And I put the buns on the griddle to toast them up :)

Remember to celebrate this terrific and tasty day responsibly!!


Friday, September 14, 2012

Roasted Chicken Purses


It was time to use up the meat we had stored in the freezer. While it’s great to have some saved in there for weeks when your budget is low and you can’t afford to buy meat (always one of the most expensive ingredients unless you want to pay for less meat and more fat), it isn’t wise to have too much in your freezer at once. You never know when some freak snow storm might hit and put you out of power for a week. Your freezer turns into a warm refrigerator by the next day and not long after that it’s room temp. Even though room temp under those conditions is pretty cold, it’s not cold enough to keep meat from spoiling.

We had about six bone-in chicken breasts that I decided to roast to get some good white meat pulled chicken for various uses. Pot pie, chicken noodle soup, chicken salad, and this particular recipe: Roasted Chicken Purses from Giada De Laurentiis.


You can use any pulled chicken of your choice. Don’t worry! You don’t have to roast the chicken yourself! Go to the grocery store and get a cooked rotisserie chicken and you’ll be fine. If you get the rotisserie chicken, get a plain old fashioned one. Nothing with any fancy seasoning since it will clash with this recipe.

It’s about time you got fancy with wonton wrappers! You’re probably familiar with them as the crunchy shell of a Crab Rangoon but did you know you can use them as a fast (faster) way to make homemade raviolis? Craziness! My favorite part is that you can prepare these when you have time then pop them in the freezer on a tray until they’re solid then bag them. Store them in the freezer until you have a night where you need a fast but homemade and scrumptious dinner! 


You’ll need:
1 ¼ c. shredded chicken  (chop up into finer pieces)
¾ c. ricotta (Giada calls for whole milk but I used skim to save on calories)
Zest from half a lemon
½ tsp chopped thyme leaves
½ tsp salt
¼ tsp pepper

Mix all of those together to create the filling. Then get your wonton wrappers out. Make sure you use the freshest available. I find that the older they are, the more likely they are to crack when you fold.
*You can also change the filling and put anything you would like in it!*

1 egg, beaten
32-38 wonton wrappers
A small, clean paint brush just for cooking purposes
Parchment paper/Aluminum foil lined tray if you intend to freeze them

Lay out 8 or 10 wonton wrappers on a clean, dry surface.


Use a teaspoon to scoop mixture and drop into the center of each square. I’m not overly generous with my teaspoons. The more filling you use, the harder it is to fold and the more likely they are to break open when cooking.


Dip your paintbrush into the egg wash and brush the sides of a wonton wrapper. I’ve seen this done with plain old water and your fingers too.


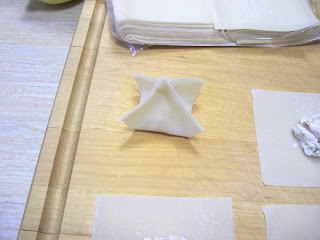
Now you’re going to fold by taking two corners opposite from each other. Bring the corners to the center and match them up. Pinch.


Take one of the leftover corners and bring to the center. Pinch with the other two.


Take the last corner and bring to the center. Pinch.


Pinch the open edges together to seal the pyramid.


Giada called these “purses” and in the episode she twisted the corners to make them look like purses. The picture on foodnetwork.com shows how they looked when she made them. However, the first time I made them, I didn’t have that picture and I didn’t remember the episode. Giada refers to the raviolis as “pyramids” in the recipe so that’s what I made the first time I did this. And from then on, I’ve made them into pyramids. Feel free to do the twist instead!

You’ll repeat the whole process, with some music playing hopefully, dozens and dozens of times until you run out of filling or wrappers. Wipe down your table or cutting board each time so you'll have a dry surface for the wrappers.


When I was done, I put them in the freezer until they were frozen solid then bagged them to be used later on in the week.

Ready to cook?

Get a large pot of water boiling, salt the water, and IN BATCHES cook your ravs for 3 minutes then put in a colander. Repeat until all your ravs are cooked.

Giada melts some butter in a separate pan then adds her purses into the pan and gives them a little toss and sprinkles with parmesan and salt and pepper. Be careful. These are very delicate.

I wanted to be a little fancier. Quite separately, I had saved a Cooking Light recipe for homemade gnocchi in a lemon-thyme sauce. I chose to make that in a separate pan and toss them in a slightly more complex sauce instead. Then I shaved some romano over the top. Yum!

These are time consuming but they’re totally worth it and you’ll feel so fancy eating them after putting all that work in! :)


Thursday, September 13, 2012

Pumpkin Bread


This was my first time baking my mom’s pumpkin bread: the pumpkin bread that I judge all others by. The moment I tasted anyone else’s pumpkin bread (especially store bought), I knew I had been spoiled rotten. While mom didn’t make up this recipe, I’ve never tasted any other pumpkin bread that makes my mouth as happy as this one.

Where did it come from? you might ask. Well, someone named Sue Lightbody shared this recipe in Wee Cook Book from the Greendale YMCA Wee Wuns Nursery School in 1995. You know, it’s one of those black plastic loop bound books that a bunch of people from one community collaborate on to put together. THANK YOU, YOU WONDERFUL SOULS!

This bread is bursting with pumpkin and pumpkin pie flavors that all meld into a rich, dense bread you could easily serve with a scoop of vanilla ice cream or with a cup of coffee. Most dessert breads, like this one, have a drier and lighter texture but this one is like eating cake. It should probably be called pumpkin cake instead but I don’t know what the classifying differences are between bread and cake. I should look into that.


Pumpkin Bread
Sue Lightbody
Wee Cook Book
Greendale YMCA
Wee Wuns Nursery School
1995


Makes 3 loaves!

Ingredients
3 cups sugar
3 1/3 cups flour
2 tsps baking soda
1 tsp cinnamon
1 tsp nutmeg
1 ½ tsps. salt
4 eggs
1 can pumpkin
1 cup canola oil
2/3 cup cold water
1-1  ½ cups nuts (optional)

Preheat your oven to 325°F then mix your dry ingredients in a large bowl. Beat your eggs in a separate bowl then mix in your pumpkin, oil, and cold water. Once all your wet ingredients are combined, slowly pour and mix your dry ingredients with your wet ingredients. If you want nuts, add them in after the batter is smooth and uniform.

Grease your bread pans. I used pans approximately 8in X 4in X 3in. Fill pans halfway. You need to give your bread space to rise and you don’t want it to rise up and over your pan.
Bake for 30 minutes then turn the oven down to 300°F and bake for another 30 minutes or until you can insert a toothpick and remove it without any batter clinging to it.

Allow to cool before eating if you can be patient! I usually wait until its cool enough to remove from the pan and then I have my first piece.

Since this recipe makes so much, you can easily freeze a loaf or two and enjoy at a later date. In fact, after it defrosts from a stay in the freezer, it is even better. The extra moisture from the defrosting process makes the bread so good!


Monday, September 3, 2012

Summer Beer Odyssey


You may have noticed that it has been a considerable amount of time since I last blogged about my culinary adventures. Let me assure you, my blog has not been abandoned. It has been on my mind all summer long but I just haven’t had the time to write much less do any fabulous cooking.

However, this summer I embarked on a Beer Odyssey (in keeping with my literary theme) with a few of my good friends. Initially, I promised to teach one of them about wine in exchange for education in all things beer related.

Beer has been the Iago to my Othello for far too long. I’ve wanted to like it but it’s just so bitter! Give me a bottle of wine over a case of beer any day but I’ve been determined to conquer this tastebud challenge. I figured it took years for my tastebuds to become accustomed to wine and then a few more years to fall irrevocably in love with it. How was I going to speed up this process with beer? It often smells acrid and tastes just as bitter (not to mention that the look of lighter beers just reminds me of urine…ewwww). I love sweet drinks and frankly cringe at the taste of some of the hopp-ier beers.

And so it all began with going to Tuesday Trivia Nights…

I wasn’t a complete novice with beer. I had tried beer a number of times and couldn’t get over the bitterness. Some of the beers prior to this summer included but were not limited to: Michelob Ultra, Blue Moon, Sam Adams Cranberry Lambic, Sam Adams Octoberfest, Corona, Budlight, Budlight Lime, Miller Light…and, of course…Coors Light. (I also tried Honey Mead at a Renaissance Faire and looooved it but that was the one exception).

Had to start with Coors Light, because the guys ordered the cheapest pitcher of beer they could on trivia nights usually. After a few weeks, the watered down hops didn’t bother my tastebuds nearly as much as they used to. Perhaps it was time to try something different!

I tried Blue Moon again and then branched out into Leinenkugel’s Summer Shandy – which was great because the citrus really cuts the bitterness from the hops.

Then I had the chance to attempt a Beer Odyssey in a day. Originally, the plan was to work our way backwards from Boston: go to Harpoon Brewery and do their complimentary tasting, go to Sam Adams, then to Beerworks maybe we would hit up the BBC and the Alehouse closer to home. We ran out of time. Odysseus had 10-11 years of wandering after the Trojan War but we only had a few hours.

We did get to try 4 different beers at Harpoon. The first of which, not by choice, was the Rye IPA. Oh my goodness! SO BITTER. I’m not ready for that. I wanted to scrape my tongue after tossing that one back as quickly as I could just to get it over with. (Though tossing it down the sink in the bathroom was a tempting alternative.) I got to choose the next three, opting for a Cider, Summer, and a Raspberry. I still prefer a little sweetness to cut the bitterness. I did try a pumpkin beer (good!) and what was called a Great Scott! and I honestly didn’t hate it.

Next we tried out Beerworks and I got the watermelon beer. (I know! Watermelon! Weird.) But it was light and refreshing, served with a hulking wedge of watermelon – no complaints here. Honestly though, the thing that I’ve raved most about since going to Beerworks is the raspberry aioli they served with my friend’s sweet potato fries! Raspberry aioli! Really it was so good I had to try and reinvent it at home.

Yeah, you noticed the wine. It's still my drink of choice.
Quick and Fresh Raspberry Aioli:
1/2 cup of mayo
Juice of 1 lemon
1 clove of garlic finely minced
6-10 raspberries

Emulsify all the ingredients in a small blender.
It will be BRIGHT pink and will remind you of frosting.
Serve it with sweet potato fries and you'll wonder why
you've never eaten your fries this way before.


And since that day of beer tasting, I’ve moved on to Shipyard’s Pumpkinhead (which is so so good especially when they serve it with the cinnamon and the sugar on the rim! What can I say? I like sweet things!) I tried a Sleepyhollow – half Pumpkinhead and half Guinness. Then I tried an actual Guinness. Which, surprisingly, I finished without making any disgusted faces!

Whatdyaknow!? I made progress over this summer after all!